


Configuration
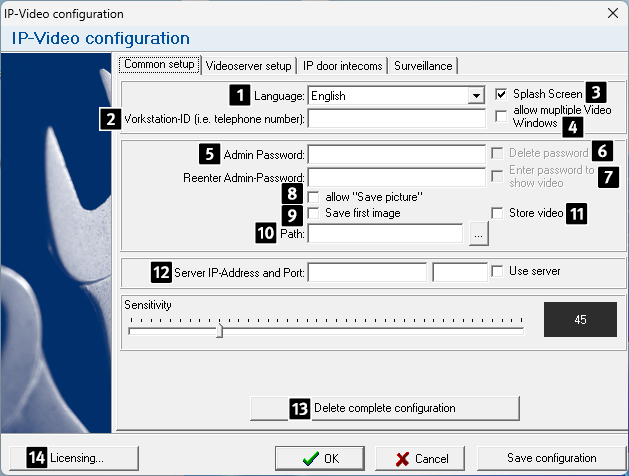
1.1. Tab "Common setup"
 Language:
Here you can specify the language of the IP video software.
 Workstation-ID (i.e. telephone number):
The phone number that the SIP station dials to reach this workstation is specified here. Whenever a Behnke Station dials this number, the camera image for this station is displayed. You can also enter several numbers to which the software should react. The individual numbers are then separated by semicolon. E.g.: "4711;4712;4713". Please note that the software can only respond with a pop-up window if the number dialed by the Behnke Station exactly matches this workstation ID.
 Splash Screen:
Here you can specify whether or not the welcome screen should be displayed when the software is started.
 allow multiple video windows:
Indicates whether another video window can pop up when there already is a video window open. This makes it possible to see the video of another Behnke Station and possibly open the door while you are still talking to another Behnke Station. If you uncheck this box, the software will only display the video of the current call.
 Admin Password:
Here you can set a password, to protect the configuration of the software against unauthorized or accidental changes. The password can be up to 20 characters long and can consist of letters and numbers.
 Delete password:
If you have set an administrator password, you can delete it again by selecting the option "Delete password" and clicking on the "OK" button.
 Enter password to show video:
If you have set an admin password, you can use this option to prevent the video from being displayed outside of a call (e.g. for privacy reasons). For calls from the Behnke Station, the video will continue to pop up without a password prompt. However, if a user wants to access the camera outside of a call, they will have to enter the password.
 allow "Save picture":1
This option turns on the "Save Picture" button in the video window. This feature enables the user to save individual images during the call (date and time are displayed in the image).
 Save first image:1
This option causes the first image of an incoming call to be automatically saved with date, time and camera name.
 Path:1
Here you can specify where to save the image.
 Store video:1
This option causes the video (without audio) of an incoming call to be recorded automatically with date, time and camera name.
 Server IP-Address and Port:
The IP video server that is to be used by the software to address Behnke Stations in remote IP networks. This configuration is always necessary when the IP video software and the Behnke Stations are located in different IP address ranges. You can find more information on this in the following configuration guide: Behnke Station and camera in different IP address range than IP video software
 Delete complete configuration:
This button completely resets the software. The entire configuration of the IP video software is deleted from the computer and the software is closed.
 Licensing...:
This button opens a dialog box in which you can enter your purchased license key. This is case-sensitive. Please note that after entering the license, the software must be closed and restarted so that the additional features can be activated.
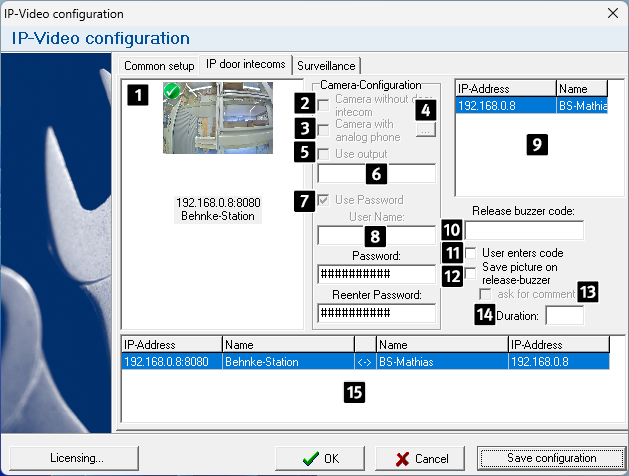
1.2. Tab "IP door intercoms"
Section "IP cameras":
In this section, you can see a list of IP cameras found on the network. A current image from the camera is displayed for better orientation. Please note that the image can only be seen after the credentials for the camera have been stored in the software. The IP address and the name of the camera are displayed below the image. Double-clicking on the image opens the web interface of the IP camera in your browser. Right-clicking in the window opens a context menu that can be used to add a camera manually. In addition, manually added cameras can be renamed and deleted, and the URL to the MJPEG stream can be changed. It may be necessary to add cameras manually in order to integrate IP cameras that were not automatically found by the software.
Camera without door intercom:
With this option you can specify that a certain camera is a camera without a Behnke Station, e.g. a surveillance camera. The video from such a stand-alone camera can either be called up manually in the software if required, or the camera can be assigned to a call station as a second camera. The video is then displayed as picture-in-picture for this Behnke Station.
Camera with analog phone:
With this option you can specify that the camera is operated in combination with an analogue Behnke phone. The camera's video is displayed during calls from the analogue Behnke phone as long as the relay connected to the "button" is closed. You can find more information on this in the instructions for the analogue Behnke telephone and in the following configuration guide: Analogue Behnke phone with one button and IP camera
Button ...:
This button takes you to the settings for analogue Behnke phones that are equipped with multiple buttons. These settings can be used to specify which button of the phone should trigger the video pop-up on this computer. Please note that this function can only be implemented with Behnke phones that are running with software version 1.61 or higher. You can find more information on this in the instructions for the analogue Behnke phone and in the following configuration guide: Analogue Behnke phone with multiple buttons and IP camera
Use output:1
If the camera is a Behnke smart camera (item no. 20-2904-IP/21-2904-IP or 20-2907A-IP/21-2907A-IP) that is operated together with an analogue Behnke phone, the IP video software is able to activate a relay on the camera. If this option is activated, a button is displayed in the video of the camera which can activate this relay.
Text box "Use output":1
If the "Use output" option is activated, the label of the button can be specified in this text field.
Use password:
For manually added cameras, this option can be used to specify whether or not a password is required to retrieve the image.
User Name/Password/Reenter Password:
If necessary, the credentials for the camera are entered here.
Section "IP intercoms":
This section lists the IP addresses of all the Behnke Stations found by the IP video software. Double-clicking on the IP address opens the web interface of the associated Behnke Station in your browser. Alternatively, you can open the context menu by right-clicking. Here you can call up the web interface via "Configure IP door intercom". "Configure special-functions" takes you to the settings of our first-generation Behnke IP intercom stations that were delivered before 2013.
Release buzzer code:1
If you have entered a license for the door opener function, the code for activating the relay of the Behnke Station can be entered here. If a code is entered, the door opener button will be displayed in the video window of the Behnke Station, with which relay 1 can be activated. Please note that the code must be given here without the final "#".
User enters code:1
With this option you specify that a door opener button is displayed in the video window, but the user has to enter the code manually in order to activate the relay. When you click on the door opener button, an input window for the code appears.
Save picture on release-buzzer:1
This option causes an image to be saved every time the door is opened via the button in the video window. The image shows the name of the camera, date and time. The storage location is specified on the "Common setup" tab with the parameter "Path".
ask for comment:1
If this option is activated, the user will be asked for a comment each time an image is saved. A corresponding input window appears. The comment is saved with the image.
Duration:
When using an analogue Behnke phone with a Behnke smart camera, this parameter can be used to define the activation time of the relay.
 Section Assignments:
The assigned pairs of cameras and Behnke stations are listed in this area. On the left you will see the IP address and the name of the camera, and on the right side the assigned Behnke station. Camera and intercom station can be assigned as follows:
- On the left side in the "IP cameras" section, left-click on the camera that you want to assign to an Behnke Station.
- Then enter the username and password for access to the camera in the "Camera Configuration" section to the right.
- Then left-click on the intercom station that you want to assign to the camera in the area "SIP Intercom Stations" on the right-hand side.
- Then click "Save Configuration" at the bottom. A new entry appears in the "Assignments" section.
Right-clicking on an entry in this area opens the context menu. Here you can remove existing assignments via "Delete entry", or assign a second IP camera to an existing assignment ("Add secondary camera"**). The image from the secondary camera is then displayed in the video window as a picture-in-picture.
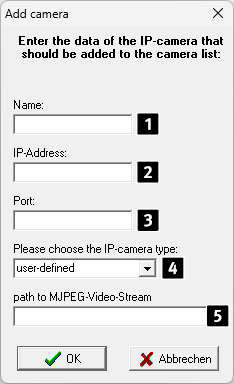
1.2.1. Window "Add camera"
You can access this window by right-clicking in the "IP cameras" section on the "IP door intercoms" tab. Click on "Add camera" in the context menu. This function is required when the IP video software could not find a camera automatically.
Name:
In this field you can specify a name to identify the camera.
IP-Address:
Enter the IP address of the camera here. For Behnke Stations with a system camera, i.e. either with a USB camera or an IP camera integrated as a system camera (see web interface of the Behnke station > Network > IP camera > "Integration as"), just enter the IP address of the Behnke Station itself.
Port:
Enter the port here via which the MJPEG stream can be retrieved from the camera. Port 80 is usually used for this. For newer Behnke Stations with a system camera, i.e. either with a USB camera or an IP camera integrated as a system camera (see web interface of the Behnke station > Network > IP camera > "Integration as"), please enter port 8080. If you are not sure which port to specify, you can use the MAC address of the camera to determine the port number using the following guide: Camera types.
IP camera type:
Select the correct camera type for your camera here. If you are not sure, you can use the MAC address of the camera to determine the camera type using the following guide: Camera types. For newer Behnke Stations with a system camera, i.e. either with a USB camera or an IP camera integrated as a system camera (see web interface of the Behnke station > Network > IP camera > "Integration as") "Behnke Station Camera" can be selected.
Path:
This field is only displayed if you have selected "user-defined" as the camera type. Enter the path to your camera's MJPEG stream here. Example: If the URL for the MJPEG stream is http://admin:adminpassword@192.168.0.86/mjpeg-stream/video.cgi, just enter /mjpeg-stream/video.cgi as the path here.
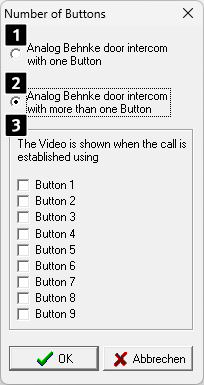
1.2.2. Window "Number of Buttons"
You get to this window by checking the option "Camera with analog phone" for a camera and by clicking on the ... button directly next to the check box.
WARNING:The settings in this window only apply to analogue Behnke phones and not to SIP devices. When using a SIP device, the check box for "Camera with analog phone" has to be unchecked!
Analog Behnke door intercom with one Button:
Select this option if your analogue Behnke phone only has one call button. The video from the camera is then automatically displayed on all computers on which the IP video software is installed when any button of the Behnke phone is pressed.
Analog Behnke door intercom with more than one button:
Select this option if your analogue Behnke phone has multiple call buttons. Please note that this function can only be used with analogue Behnke phones that have a firmware version higher than version 1.61. Please also note that there are certain settings in the phone that are mandatory to use this feature. You can find more information on this in the manual of the Behnke phone or in the following configuration guide: Analogue Behnke phone with multiple buttons and IP camera
The video is shown when the call is established using:
For analogue Behnke phones, you can specify here which key should trigger the automatic video display on this computer.
1.2.3. Window "Behnke IP-Doorphone Special Configuration"
You get to this window by right-clicking on a Behnke intercom station in the "IP intercoms" section to open the context menu and clicking on "Configure special-functions".
WARNING:The settings in this window only apply to Behnke SIP intercoms of the first generation (delivered before 2013). With newer models, these settings can be made directly on the web interface of the device.
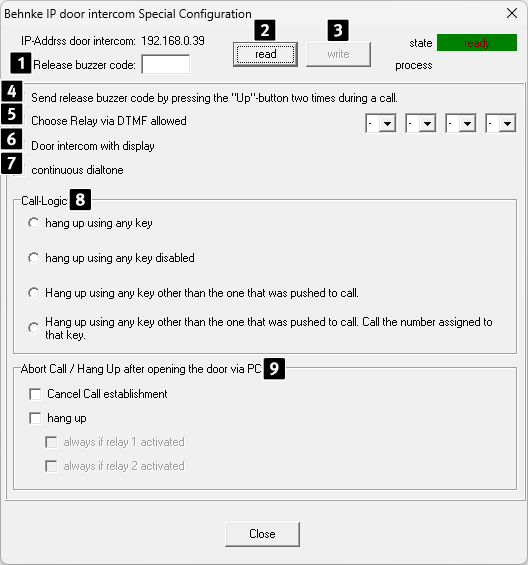
Release buzzer code:
In the case of a SIP intercom station unknown to the software, the door opener code must first be entered here. If the code has already been entered on the "IP door intercoms" tab, the code no longer has to be entered manually here.
Button "read":
If you have entered the code manually in the "Release buzzer code" field, you can then use this button to read out the current configuration of the intercom.
Button "write":
You can use this button to write the settings to the intercom. Please note that this is only possible after a successful read process.
Send release buzzer code by pressing the "UP"-button two times during a call:
If this option is checked, you can send a DTMF code from the phone book to the remote station during a call by pressing the "UP" button twice. Either the code of the called subscriber is sent as the code, or if the call was set up by the remote station, the code of the identified subscriber or that of the unknown caller is sent.
Choose relay via DTMF allowed:
If this box is checked, you can use the DTMF code sequence *"99n#" to select the relay to be actuated, with "n" being one of the following values:
- 0 = Both Relays (at a new call or after DTMF timeout)
- 1 = relay 1 only
- 2 = relay 2 only
The actual door opening code must be sent directly after the selection sequence, otherwise the selection value will be reset by the timeout. Even if the function is activated, you can still enter the door code alone (i.e. without preselecting "*99n#")!
Door intercom with display:
Check this box if your SIP station is a device with a display.
continuous dialtone:
Check this box if you want the intercom station to output a continuous dial tone when a call is triggered.
Call-Logic:
Select the desired behavior here:
- hang up using any key
- hang up using any key disabled
- hang up using any key other than the one that was pushed to call
- Hang up using any key other than the one that was pushed to call. Call the number assigned to that key.
Abort call/hang up after opening the door via PC:
This function is used to cancel an initiated call or to disconnect if the door opener relay has been activated via the UDP remote control. To do this, the respective relay must be configured with the "Door opener" function. Otherwise the function will only be executed if "whenever relay 1 is activated" or "whenever relay 2 is activated" is set.
1.3. Tab "Surveillance"1
WARNING:This tab is only visible if the fee-based license for video surveillance has been installed in the IP video software (video multiplex).
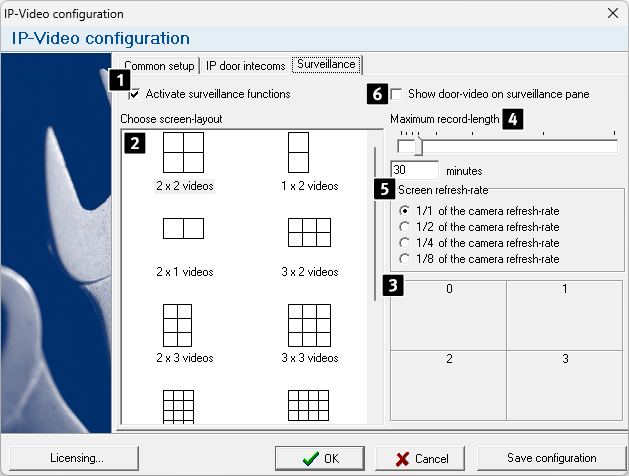
Activate surveillance functions:
If you check this option, the video multiplex window will be opened. If you want to close the window, please uncheck this option.
Selection window:
In the selection window you can define the layout of the video multiplex window. To add a camera to the layout, switch to the "SIP stations" tab. Here you can then drag & drop a camera from the left area of the window to the desired position in the video multiplex window. The configuration window then switches automatically to the "Video Surveillance" tab.
Overview:
In this overview, the selected layout for the video multiplex window is displayed again with the camera names at the corresponding position. Right-clicking on the camera name takes you to the context menu in which you can specify whether the camera's video may be recorded or whether it should record permanently. The camera can also be removed from the multiplex again using this context menu.
Maximum record-length:
If videos are recorded, you can set the maximum duration of a video sequence with this slider or by entering it directly. After this time, the current recording is ended and a new recording is started in a new file. This means that the recording at a specific point in time can then be easily accessed later.
Screen refresh-rate:
You can reduce the processor load created by video multiplexing by lowering the refresh rate. This reduces the frame rate of all displayed cameras by the corresponding factor. When set to ¼, a camera that delivers 20 fps will display 5 fps. If another camera delivers 60 frames/s, 15 frames/s are displayed by this camera. This setting only affects the processor load on the display PC.
Show door-video on surveillance pane:
To increase clarity, you can also display the door video within the video multiplex. The door video will be displayed at the top position when the "Door video in surveillance window" function is activated and not as a separate window. After the end of the call, the originally configured camera is displayed again. Thus, the video multiplex is not covered by the displayed door video.