


SIP registration is failing
On this page you will find some setup help for various telecommunications systems, as well as possible causes for a failing SIP registration.
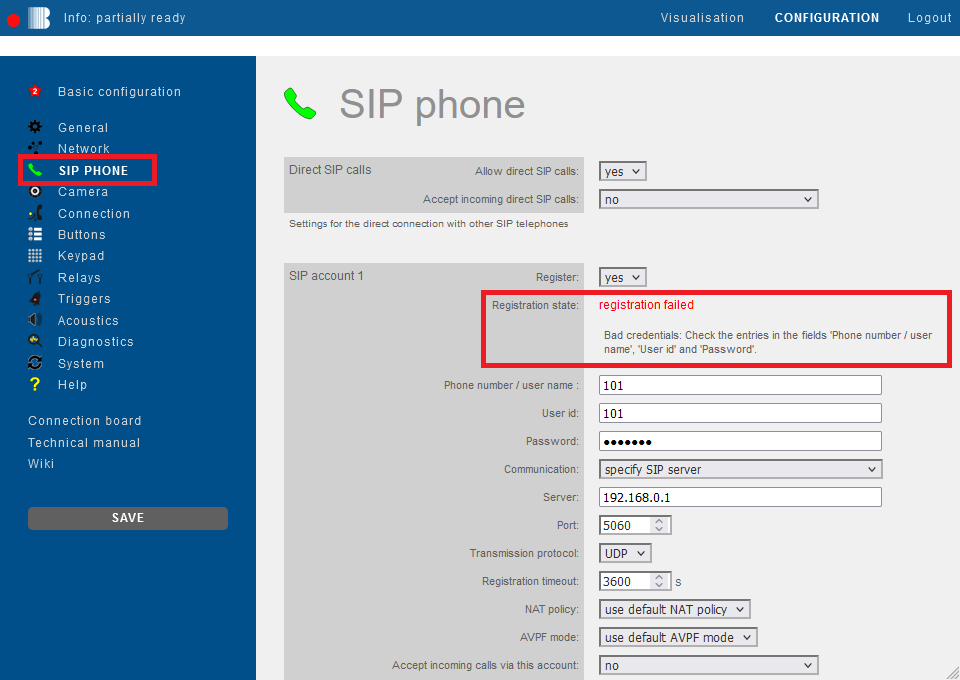
You will receive an initial indication of why the registration is failing directly under the menu item "SIP phone" in the SIP settings. If you have stored the SIP credentials there and clicked 'Save', the Behnke Station will immediately try to register. If the registration fails, a corresponding message will be displayed under "Registration state":
1. General information about SIP
Here you will find an overview of the protocols and port numbers used by the Behnke Station for VoIP telephony. If there is a firewall between the Behnke Station and your SIP server, the port numbers and the selected transmission protocol must be taken into account in your firewall rules! Otherwise the Behnke Station will not be able to register with the server via SIP!
As a transmission protocol for SIP you can use UDP, TCP, or TLS. By default the Behnke Station uses UDP. You can set the transmission protocol to be used for the Behnke Station's two SIP accounts under the menu item "SIP phone".
By default, the Behnke Station will send SIP messages to destination port 5060. This port number depends on the configuration of your PBX and possibly also on the transmission protocol used. For SIP via TLS, port number 5061 is used by default. You can also set the port numbers for the two SIP accounts of the call station.
In the factory settings, the call station also expects SIP messages on port 5060. You can set the port under "SIP phone" in the "Network" section.
Please note that the transmission protocol and port numbers may differ for your installation. If in doubt, you can ask your local admin or your PBX's support for this information.
The actual media streams (audio and video) use different protocols and port numbers:
Audio and video data are transmitted either unencrypted via RTP or encrypted via SRTP, ZRTP or DTLS. UDP is used as the transmission protocol in any case. By default, the call station sends and expects audio data on its local port 7078, and video data on port 9078. These port numbers can also be set on the web interface. See menu item "SIP phone", section "Network".
2. Configuration guides
Below you will find some configuration guides for PBX's and SIP providers. There you will receive information on how to store the SIP credentials in the Behnke Station in order to log in to the respective system. If registration fails despite the information provided there, please follow the further steps on this page.
- 3CX®
- Alcatel-Lucent® OmniPCX® Enterprise
- Alcatel-Lucent® OmniPCX® Office
- Cisco® Call Manager (CUCM)
- Genetec Sipelia™
- innovaphone® IPVA
- innovaphone® Cloud system
- Linphone® Free SIP Service
- Microsoft® Teams®
- nfon® Cloud system
- RingCentral® Cloud system
- Swisscom®
- Unify® Office
- Vodia® HostedPBX
3. SIP server/PBX not reachable
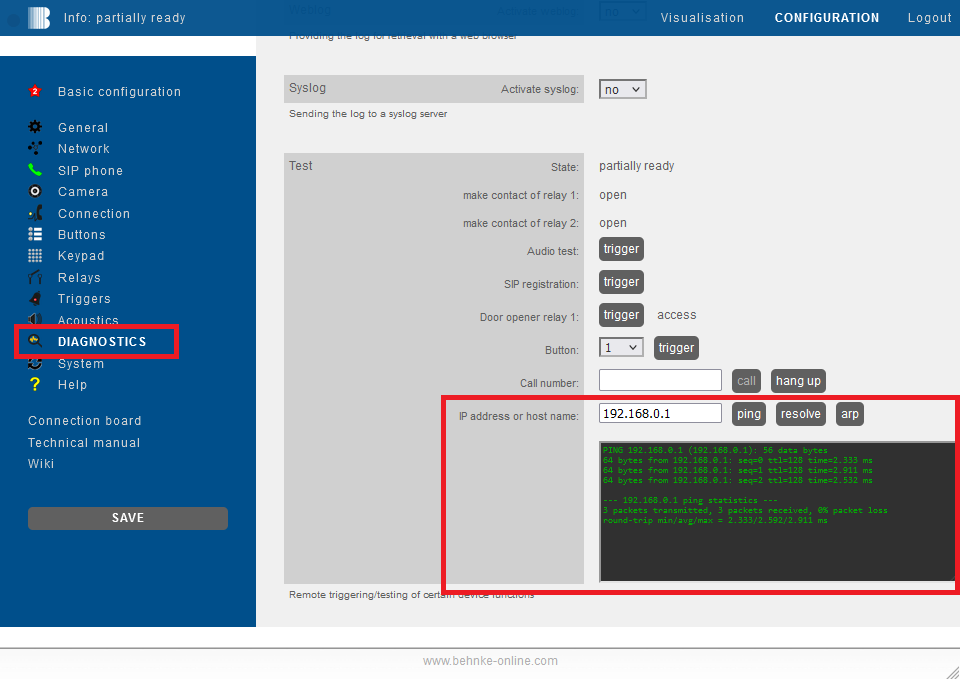
The SIP server or the telecommunications system may not be accessible from the call station via the network. Whether this is the case can be checked using the menu item "Diagnostics". Here you can ping the server as a test. If you have entered a DNS name as a SIP server in the SIP settings, you can also check here whether the name resolution works:
4. Wrong SIP credentials
The SIP credentials may simply not have been stored in the correct form in the Behnke Station. Below you will find some information about this.
4.1. Field "Phone number/user name"
This field should not be empty. Depending on the telecommunications system, either a user name, the phone number of the Behnke Station, or the SIP login name may have to be entered here. If in doubt, various options must be tried out, as this varies from SIP server to SIP server. For some cloud systems, the name of the cloud service is appended with "@", for example +123456789@my-cloudPBX.provider.com.
4.2. Field "User id"
If your SIP server requires authentication, the Behnke Station's ID with which it is supposed to register with the SIP server is entered here.
4.3. Field "Password"
This field can only be empty if no password is required to log in to the SIP server or no authentication is required in general.
4.4. Field "Communication"
-
"specify SIP Server": If you want the Behnke Station to direct its registration and calls to the same SIP server, select this option. Then enter the host name or IP address of the server in the "Server" field.
-
"specify SIP Server and substitute SIP server": If you want the Behnke Station to direct its registration and calls to the same SIP server, and use a different server in the event of a SIP server failure, select this option. Then enter the host name or IP address of the servers in the "Server" and "Substitute server" fields.
-
"specify SIP registrar and SIP proxy": If you want the Behnke Station to direct its registration requests to one SIP server (registrar) and its calls to another server (proxy), select this option. You then enter the host names or IP addresses of the servers in the "Registrar" and "Proxy" fields.
ATTENTION:Please do not select this option if the registrar and proxy use the same IP address. In this case, select the "specify SIP server" option here! For some cloud systems, a system name must be specified during registration that differs from the actual SIP server and cannot be resolved via DNS. This system name may not be specified here as a registrar or proxy! Instead, append the system name with an "@" in the "Phone number/Username" field! -
"specify SIP domain and request server via DNS": Choose this option if your provider only gives you a SIP domain instead of an actual server. The corresponding server is then determined via DNS NAPTR/SRV. Then enter the domain in the "Domain" field.
5. Generating diagnostics
If registration fails despite the information listed here, we need the Behnke Station's diagnostics to troubleshoot. Before you download the diagnostics from the Behnke Station, please make sure that the error (failed SIP registration) occurred shortly beforehand so that the error is visible in the diagnostics. If in doubt, simply trigger a registration attempt via "Diagnostics" > "Test" > "SIP registration" > trigger.
Then go to "Diagnostics" in the menu on the left. There you simply click on the 'download' button in the "Log" section under "Diagnostics" and simply send in the file. To do this, you can create a support ticket using the following link, whereupon you will immediately receive a reply email. You can then simply send the diagnostic file in response to this email.